This post describes designing and building of Python controlled DYOR Pasta.
In this post, we will explain the design and programming process of our DYOR named Pasta. This work was carried out as a part of the Mobile Robotics class.
The Design
The template used for the robot design was a standart “DYOR Corte Láser Madera FDM 3mm (Pinzas)” available on websites of Robótica Fácil (DYOR Corte Láser Madera FDM 3mm (Pinzas) – Robótica Fácil (roboticafacil.es)).
Below, you can see the list of parts we used to build our robot:
- Wooden Base for DYOR
- Arduino Nano v3.0 Board
- Extension Shield for Arduino Nano
- Micro Servo FS90R (2x)
- Wheels Rueda FS90R (2x)
- Castor Wheel Rueda Loca
- Ultrasonic Sensor HC-SR04
- IR Sensor TCRT5000
- LED Matrix 8×8
- Bluetooth Module HC-06
- Battery Holder with power switch and cable
- 9V Battery
- 2×10 DuPont Cables Female-Female
- USB-mini cable (capable of power and data transfer)
To put all the parts together and build the robot, we used basic glue gun. All the electronic were connected using guide on DYOR websites. You can see the all set for action Pasta on pictures below. You can notice, that our Pasta is wearing some kind of scarf from a black sticky tape. This is not only a fashion accessory, but we needed to lift up a bit the IR sensor, because it was sending irrelevant data.


Main Functions
- Manual Remote Control of robot movement – we can control where Pasta goes through our GUI or just simply using our keyboard (W,A,S,D). There is also a button “Do a 360°” for Pasta to celebrate :-).
- Remote Control of robot emotions – through GUI we can set if Pasta is sad or happy
- Line Following with Obstacle Detection – using IR sensor, Pasta can follow black line and if he detects any obstacle in front of him (closer than 5 cm), he stops. This feature can be activated with pressing “l” on the keyboard or “Line Follow” button in GUI.
- Graphical User Interface with all the controls
Programming
Python is used for both, robot programming and creating a Graphical User Interface to control the robot.
In case of programming, we decided to take different approach and use Python to do all the work in. To our Arduino Nano board, we simply uploaded the Telemetrix library (can be downloaded in Arduino IDE – Telemetrix4Arduino – v5.4.0, GitHub – MrYsLab/Telemetrix4Arduino: The Telemetrix Project Server For Arduino-Core). This library will make sure, that Pasta understands all the commands send to him through Bluetooth.
Also, we had to install the Telemetrix into our python (by just simply writing “-m pip install Telemetrix” into our opened terminal in python). After these two major steps, we were all set to start programming Pasta.
We created all the functions for robot movements, sensing, etc. in Python as well as the GUI (we provided the code in attachments). When we run the code, it connects to Pasta’s bluetooth module using serial port of our laptop (it is necessary to find out which COM port is your laptop using for communication with robot and specify it in the code). Arduino Nano board then receives commands from Python and translates it through Telemetrix.
Main bottleneck of this solution is the fact that line following is remote, which basically means, that all the computing is done in python on laptop and not in robot itself. This causes that the line following process is slow, because the data from sensor need firstly go to laptop through Bluetooth, then there is the computation in Python and according to the result, corresponding commands are sent to the robot.
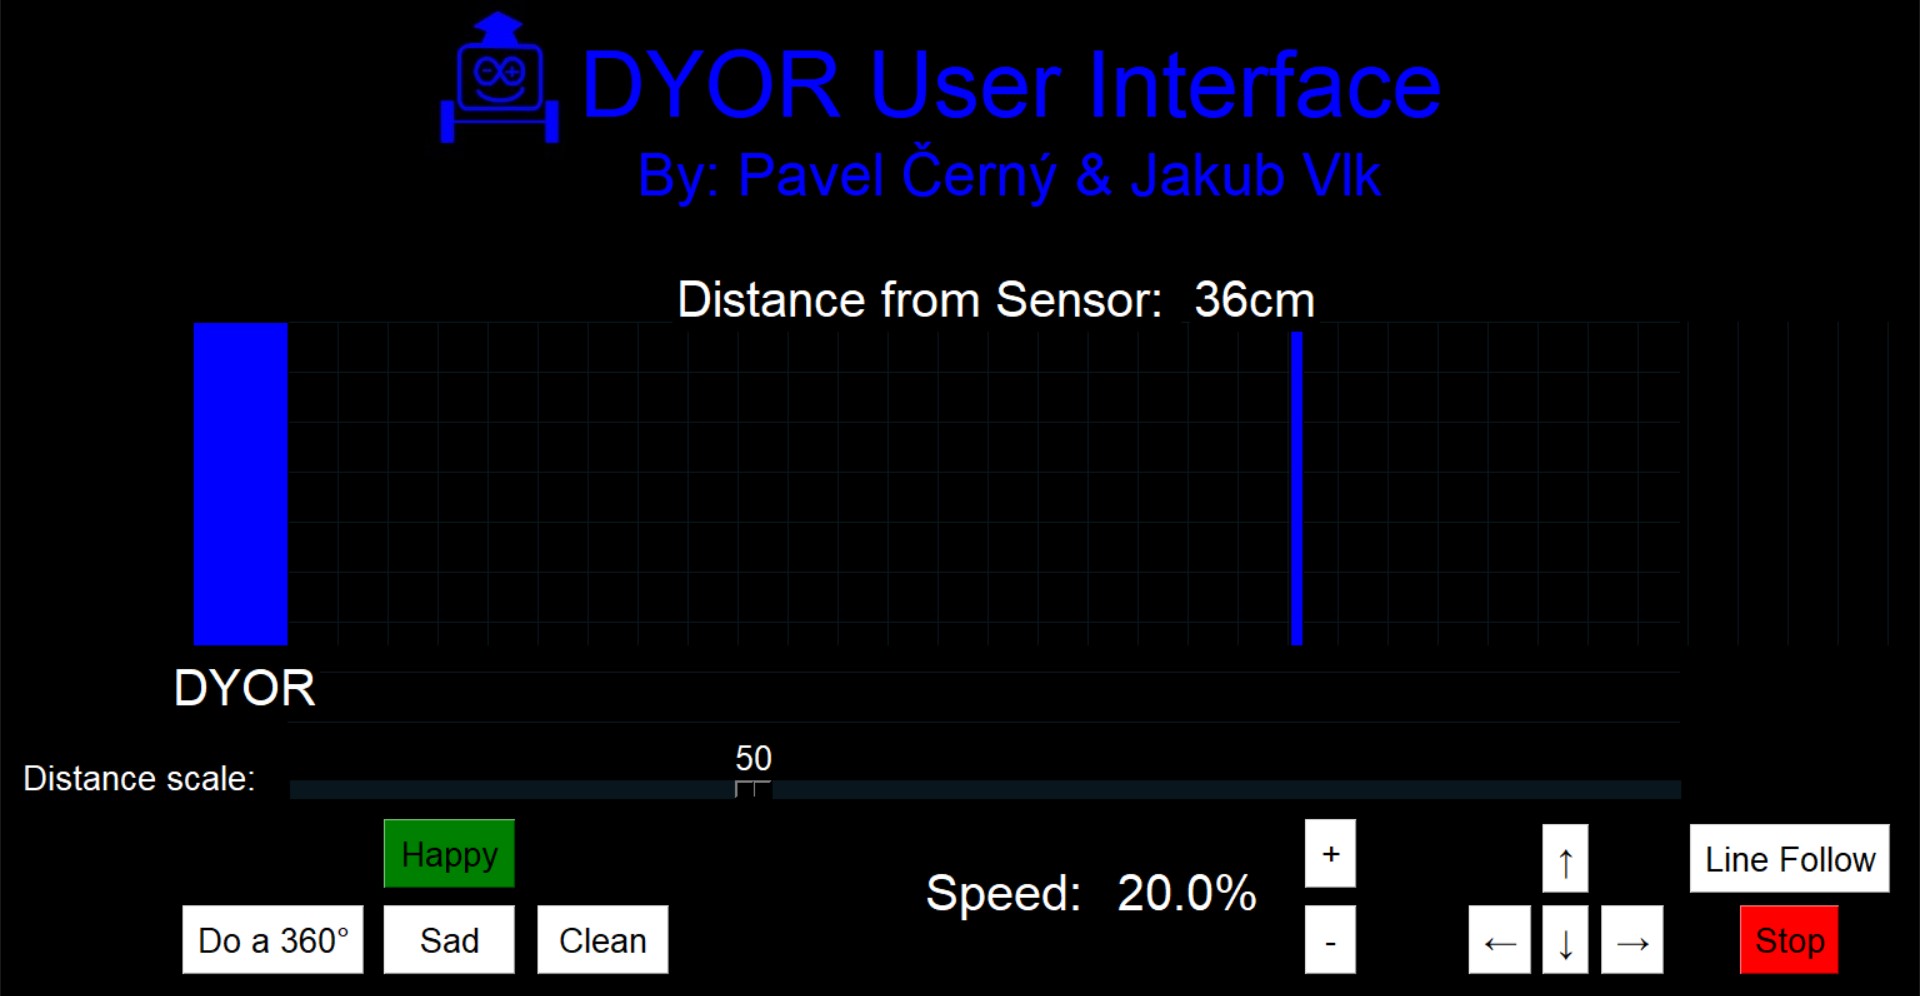
Graphical User Interface Description
On the picture below you can see the Pasta’s GUI. There is a section which shows data from the Ultrasonic sensor, saying how far Pasta is from obstacle in front of him and also showing it on a simple graph. By dragging the slider left or right, we can adjust the distance scale (how big is the distance shown on the graph).
In the bottom left part, there is an emotion control and also celebration button. More to the right, we can also adjust the manual speed our robot. In the bottom right part, there is a control of the robot direction and also line following and stop button.
Robot direction can be also controlled by using keyboard (w,s,a,d), “l” will start the line following process and “escape” will end it.
Video with Description
You can see Pasta in action on the video. Below the video, you can also find a description of control.
In the first 10 seconds of the video, we can see how our GUI for Pasta is being launched with python code, which was already described. Then the camera fixes its view on the already initialized robot. In the following 5 seconds we can see how robot is remotely controlled with preset keys (as usual w for movement forward, a – left, s – backwards, d – right).
From the 18th second to the 34th second we can see how our Pasta is reacting with just simple clicking on the buttons in the GUI. Firstly, Pasta starts being Happy, then Sad, and after that we can clear the LED matrix with “clean” button. We can also see how our Pasta does the 360 °.
Starting from 44th second Pasta start Line Following, with a simple pushing of “L” key (or another possibility by clicking on the Line Following button in the GUI). We can see that our Pasta is reacting slowly, it is because of slow data sending between Bluetooth computer and Bluetooth module of Pasta. When the TCRT 5000 sends a signal via Bluetooth to our computer, it is subsequently calculated and then sent back to the Pasta, creating a delay.
At the 59th second we can see how Pasta stopped because of obstacle in his way. We can see that also in the GUI with the “Distance from the sensor” and also with blue lines that are coming closer to our Pasta. With that Pasta is not hitting any obstacle in his way and we can easily move with him manually with key to avoid the obstacle. After that we find a way back and finish with the Line Following.
Finally, Pasta celebrates with 360°. After the celebration (90th second) we can see that it is also possible to put more speed into his wheels.
Thanks for reading! We hope this post will help with your project.
Pavel and Jakub