[:en]This blog entry shows an example of a DYOR robot as built in class. The robot consists mainly of an Arduino Nano, different electric sensors and actuators. Moreover, it was programmed with the simplified coding software Facilino.
Components
These parts were used in this robot:
- Arduino Nano + Shield Arduino Nano I/O
- Powerbank
- OLED
- Bluetooth Modul HC-05
- Servos SG90 (for the arms)
- Servos FS90R (for the wheels)
- Ultrasonic Module HC-SR04
- Infrared Sensor TCRT5000
- Buzzer KY-006
- Cables
Design
The design of the aluminium sheet metal is made in Solidworks and cut by laser. Holes were considered for the assembly of every component of the robot. This version from class is designed for wheel drive and two grabbers as hands.
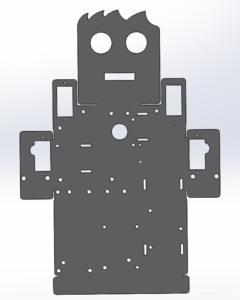
Figure 1: Sheet Metal
Assembly
Each component is connected to the Arduino board with cables. Usually, there are three different cables, but the number may vary: ground cable, power cable and data cable. The Arduino is powered by a Powerbank and the rotation parts (wheel and arms) are assembled to the servos.

Figure 2: Assembled Robot
App
The App is designed in AppInventor2. The purpose is to move the robot with a mobile phone which are connected to each other with Bluetooth. The app’s design for this robot is shown below. Also pictures can be assigned to the buttons which are not in this example. The app in general lets us connect and disconnect to the phone, move the robot manually with buttons or automatically with the tilt of the phone. In addition, it can move the arms and start preassigned programs.
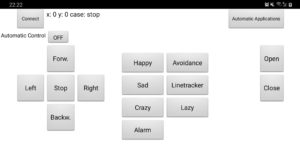
Figure 3: Simple App Layout
Functions
Function 1: Manual Mode
The robot moves by the commands given by the app. Manual and automatic driving can be toggled.
From here mode 2 and 3 can be started.
Function 2: Distance recognition
The robot moves forward until it recognizes an object in 20 cm distance with the sonar sensor. In that moment the buzzer makes noise, the robot stops and turns randomly to the left or to the right. The turning angle is also random and is set between 80 and 210 degrees.
Function 3: Line Tracking
The robot is able to follow a black line automatically, using an infrared sensor to detect light intensity differences. The process of function 2 and 3 can be stopped by the app.
Video
This video shows the programmed functions of the robot. The order is according the chapter above, starting with function 1, then 2 and ending with the linetracking.
[:]