This publication explains the elaboration of a biped bat, from the design and connection to the description and demonstration of its functions.
Design
For the design of this robot, the model of a standard DYOR bPED has been used as a basis, such as the one found in the link Diseño_QCAD_bPED. Different modifications have been made on it, mainly on the front face of the robot or on the feet, thus giving it the desired bat shape:
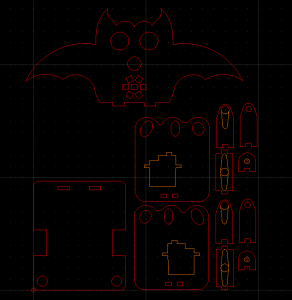
All these pieces have been laser cut on wood and subsequently personalized with black and red acrylic paint.
Electronic components
The electronic components that have been used are the following:
- Arduino Nano v3.0
- I/O Extension Shield Arduino Nano
- Powerbank 3600mAh USB
- Mini-USB cable for the Arduino Nano conection
- DuPont Female-Female Cables 20cm
- SPP-C Bluetooth Module (compatible HC-06)
- Micro Servo SG90 (4 in total, 2 for the legs y 2 for the ankles)
- Ultrasound Sensor HC-SR04
- Ring RGB LED WS2812 5050
- Buzzer KY-006
- LDR Light Sensor KY-018
- Digital Capacitive Sensor TTP 223B
Note:
Since the Powerbank did not provide enough power to move the robot, it has been replaced by a battery holder for 9V batteries (a power adapter has also been used to allow the robot to be plugged into a socket during various tests, thus reducing the cost of the battery).
In addition, two bearings have been used together with two 2mm diameter screws and nuts to make the union between the “ankles” and the “legs” of the bPED robot.
Connections
The connection of the different pins of the Arduino Nano extension board has been carried out as follows:
- Ring RGB LED ⇒ pin 2
- Buzzer ⇒ pin 3
- Servomotors:
- Right leg ⇒ pin 4
- Left leg ⇒ pin 5
- Right ankle ⇒ pin 6
- Left ankle ⇒ pin 7
- Ultrasonic Sensor:
- Pin ECHO ⇒ pin 8
- Pin TRIGGER ⇒ pin 9
- Bluetooth Module:
- Pin TX ⇒ pin 10 (RX for Arduino)
- Pin RX ⇒ pin 11 (TX for Arduino)
- Digital Capacitive Sensor ⇒ pin 12
- LDR Light Sensor ⇒ pin A0
Moreover, it should be noted that the ring of LEDs has required the soldering of three wires.
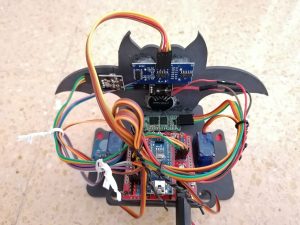
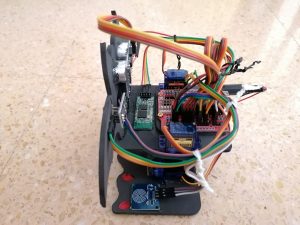
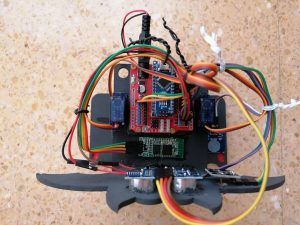
Finally, some pictures of the assembled robot from different perspectives are shown below:

Programming
To carry out the programming of the robot, the software of the Arduino itself has been used together with the help of the Facilino block programming software.
Robot Functions
The designed robot has four different operating modes, which can be controlled through the created application explained later. A brief explanation of each of them is written below:
Manual Mode:
First of all, this mode allows you to move the robot through the use of different buttons in the app, such as walk forward, walk backwards, turn right and turn left. Other specific movements can also be selected: up and down, swinging feet, turning feet forwards or backwards, bending or jerking one foot, showing nerves or excitement, walking sideways, etc.
Apart from this, the user can select different expressions to be generated on the LED ring, such as a sad or happy smile, an arrow to the right or left, a circle, a cross, etc., in addition to any other expressions created by hand as it will be shown in the video with the demonstration of every mode.
A series of predetermined melodies can also be played by the buzzer, such as Nations Army or Dragon Ball among many others, as well as the Pirates of the Caribbean melody, which has been created and included in a personalized way.
Finally, this mode provides the option to control and move the robot with the mobile phone’s accelerometer, so that when it is tilted forward, backward, right and left, the robot will perform the corresponding movement as can be seen in the video demonstration. When the mobile is left in a horizontal position, the robot will remain still.
Avoid obstacles:
In this function, the robot walks forward as long as it checks that there are no obstacles. As soon as it detects one, the robot stops, performs a series of animations (different movements, sounds and expressions on the LEDs that will be demonstrated in the final video) and ends up rotating its direction to the right or left randomly. When this is complete, the robot checks again whether there are obstacles or not and acts accordingly, thus repeating the process continuously.
Dancer:
Within this mode, the user can select through the application a melody from among 6 available. The robot will then perform a specific choreography made up of LED movements and expressions personalized exclusively for each of the songs.
Night Mode:
In this mode, day and night are distinguished, using for this the continuous reading of the light sensor, whose value will also determine the brightness of the LEDs (they will shine more when there is less light).
As long as this sensor detects light within a certain threshold, the robot will be in “day” mode, while when the amount of light decreases below a certain value, the robot will go into “night” mode, changing the expression shown in the ring of LEDs and emitting a sound. In addition, if the bat’s foot (where the digital capacitive sensor is located) is touched at night, it will perform one of three movements depending on the level of darkness, in addition to making all the LEDs blink.
Finally, for each light sensor reading, the darkness value (in %) is sent and displayed in the mobile application, as well as whether the “day” and “night” modes are activated or deactivated, respectively.
Application
Using the App Inventor 2 programming environment, a mobile application has been created for the Android operating system through which the robot can be controlled remotely.
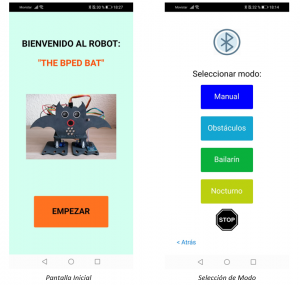
First, a welcome window appears and after it you access the menu where you can choose the desired mode:
If you access the manual, dancer and night modes, you can see the following interfaces respectively, each containing all the options mentioned in the description of the functions (the obstacle avoidance mode does not have another window):
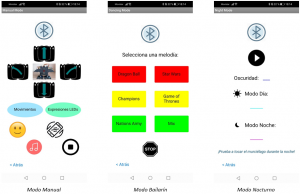
The option to activate bluetooth appears in all windows since it is necessary to activate it every time a new window is accessed.
Demonstration of the robot operation
Through the following link you can access the video with the demonstration of the robot operation: The_bPED_Bat
Author
Jesús Conejero Rodríguez
Industrial Electronic and Automatic Engineering Degree, Universidad Politécnica de Valencia