In this entry, we introduce the block creation tool of Facilino: Facilino MyBlocks.
Facilino MyBlocks is a tool for creating your own blocks with Facilino. The aim of this tool is that is can be used for advanced users that want to implement a feature that is not implemented in Facilino in one single block. It is mainly targeted to teachers to create their own blocks and shared them with other users, but it is also useful for programmers who want to create their own components.
In this sense, we can create blocks that can be later on included in Facilino in a very easy way, even for individual use or for a group of people. In case of individual use, the blocks will be automatically saved in an internal library of MyBlocks that will be used by Facilino, while if we want to share our block with other people, we will need to export our project, as well as all images and HTML documents associated with them).
In order to use Facilino MyBlocks we need first require to understand how the code generation works for Arduino and Blockly (it is recommended to read about Arduino API and Blockly API if needed), although in a very intuitive way, we can learn how to use this tool.
Facilino MyBlocks UI
Here we show the UI of Facilino MyBlocks. This includes a menu bar with typical features for open/save “XML” files containing defined blocks, as well as simple tools to manage MyBlocks library. It also includes a dropdown list with the available blocks in the library as well as an icon to exit Facilino MyBlocks and return to Facilino.
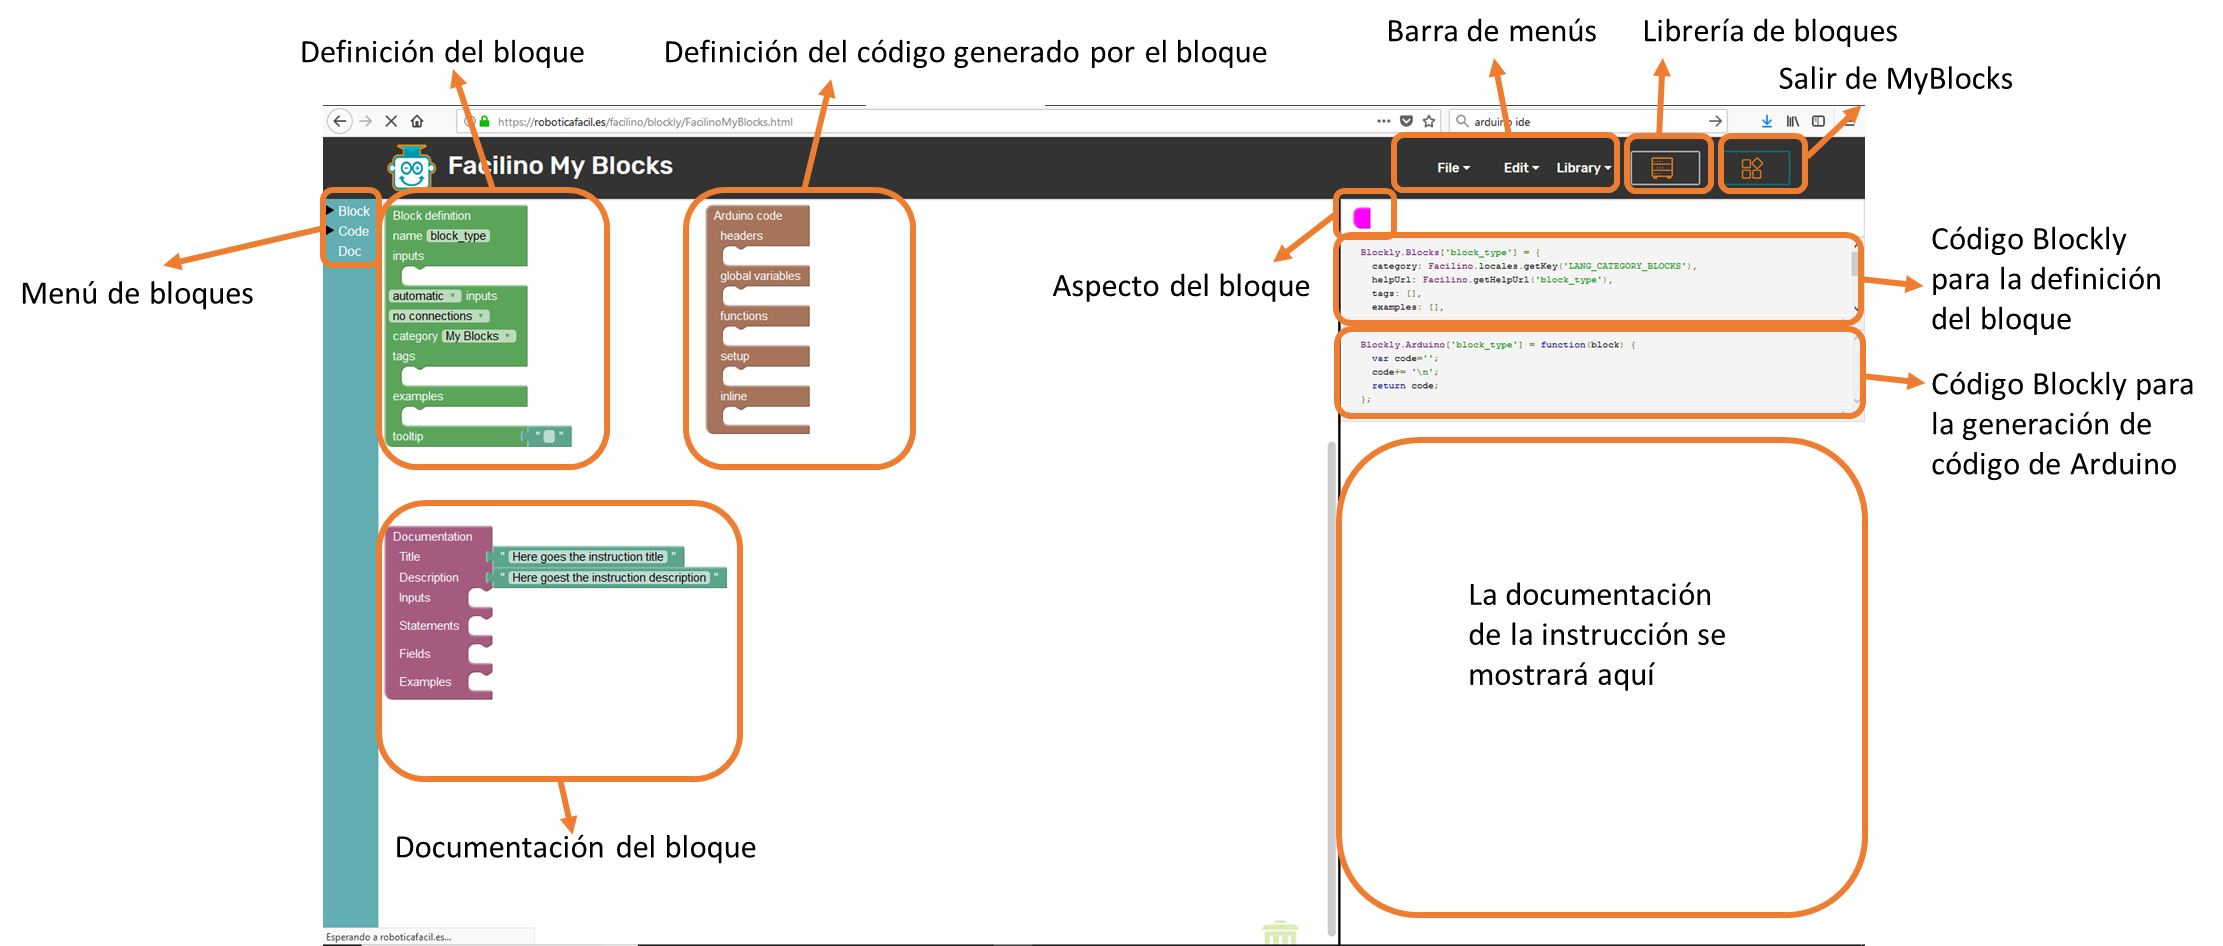
Facilino MyBlocks allows you to define the block “shape” (a.k.a. block definition), define the Arduino code generation and the documentation associated with the block. Block definition and code generation are mandatory in order to use the block, while documentation is optional, it is very convenient to create a proper documentation if you intend to share it and for yourself.
In particular, at the toolbox (on the left) we have three different types of categories: “Block”, “Code” and “Doc” (each of them with instructions associated with the parts mentioned before).
Block definition
Block instructions in this category will define the shape of the block, such as inputs, output, connections, fields, colour, etc. This is the first step we need complete since the code generation will mostly depend on the available inputs/fields and (optionally) the output to create the code. As long as we change the aspect of the block the shape will be automatically rendered on the right view, as well as the Blockly code use to generate such shape.
On each block, we can use the tooltip by placing the mouse over the instruction.
Now, we will describe the available options and discuss each of them:
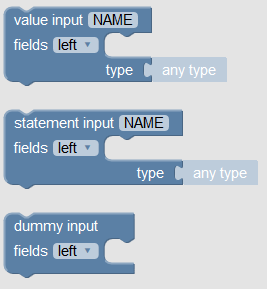
Inputs
Inputs of a block can be configured in the same way as Blockly works. An input of type “Value Input” is an input that expects that a value will be introduced by the user, while a “Statement Input” is used to define stacks so that other blocks can be nested inside. A “Dummy Input” are inputs that can group fields with different information.
“Value Input” inputs will generate a Blockly code for Arduino code generation, for instance:
var input_name = Blockly.Arduino.valueToCode(block, 'NAME', Blockly.Arduino.ORDER_ATOMIC);

In a similar way, "Statement Input" will generate the following code:
var statements_name = Blockly.Arduino.statementToCode(block, 'NAME');
A “Dummy Input” does not generate code in this section (it simply affects to the block definition).
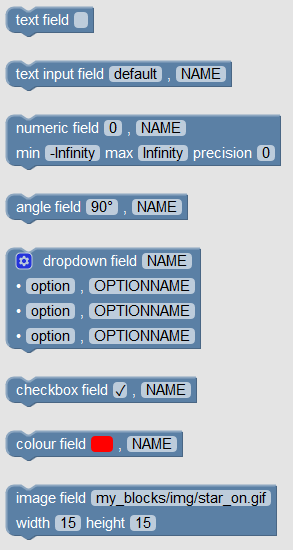
Fields
Fields allow you to show text, introduce text, options, but opposite to “Value Input” inputs, they can not be connected with other blocks. Depending on the information we want to show, the field could be simply a text field or even a URL for an image to show. Other fields, such as “Text Input field” allow the user to introduce its own text, “Dropdown Field” shows a dropdown list with options to select, “Checkbox field” shows a checkbox and “Colour field” allows you to select a colour.
All fields with a field “NAME” will also generate code in the Arduino code generation section. In particular:
var field_name = block.getFieldValue('NAME');
Types
Variable types allow you to define the compatibility for connecting different blocks between each other. For instance, if we want to accept only one type of inputs information, then we must select this as the input type. This will allow preliminary detect potential errors when programming with Facilino because Blockly won’t allow their connection.
Labels and Examples
These options have been included as future options, but now they do not have an effect.
Arduino Code Generation
In order to generate Arduino Code, you need first to understand how Arduino code works, but also you need to understand how Facilino internally works.
Arduino requires some libraries (or “headers”) to increase their functionalities. Most of them have been developed by third-parties and have not been included in Arduino’s core, but they are available through the library manager. On the other side, we can define functions and global variables that we can use in other code sections. Some blocks they do require a set of “text” code instructions, for instance when initializing a device that must be included in “Setup” section of Arduino. Many blocks they require to generate also other instructions or methods based on the ones that we have defined in the “Setup” section. For instance, “Serial.begin()” is usually included in the “Setup”, while instructions such as “Serial.read” or “Serial.write”, among others, will be required to be used whenever the block is placed. In order to avoid multiple instances of the same code, such as “Serial.begin” every time we include a block we need to define section names within the setup section. So if the section name is the same, all blocks are expected to share the same part of the code to be generated (otherwise, the last block will actually define the code to generate). Therefore, it is reasonable to define a section with the name “Serial” such that all instructions that require using the Serial port will also include this section too. On the contrary, the “Inline” section is precisely included to generate code wherever the block instruction is placed, which can be either “Setup” or “Loop” functions of Arduino.
Headers
We can include headers by simply including the header name. For instance, the header name “Servo.h” will actually generate the Arduino code “#include <Servo.h>”

Variables
We can define global variables with predefined types of Arduino code or variables with some class name. The names of the variables must be unique so that the compiler does not report a compilation error and once established the name, it will appear in the dropdown list of variables that can be selected to generate code in global functions, setup or inline sections.

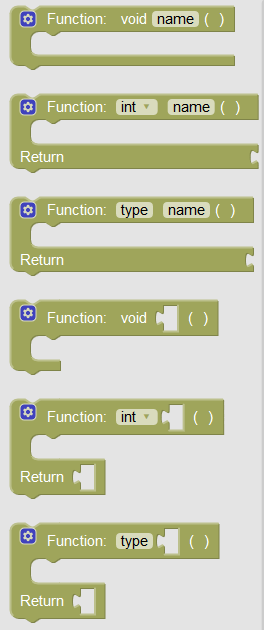
Functions
Functions allow you to generate some code that can be reused later when calling it in different places. To define a function we need first specify the type of the function we want to create, so we need to know the type of input and output arguments that. Once defined, we can drag and drop blocks in it that will be included in the code of the function. It accepts variables and basic control structures (if, switch, for, while). This is described in the “Inline” section because it shares most of the features of this section.
Setup
As previously mentioned, the code generated in the Arduino Setup is organised in sections, so we need to assign a name to each section. If you want to use some section name compatible with the already existing names in Facilino, please contact soporte@roboticafacil.es.
Within each section, we can include code blocks to generate the actual code that it will be included just once in the Setup function of Arduino. This is described in next section because it shares most of the features of the code generated in the “inline” section.
Inline
Global functions, setup and inline sections allow you to generate Arduino code using blocks. Here we show the types of instructions that we can use:
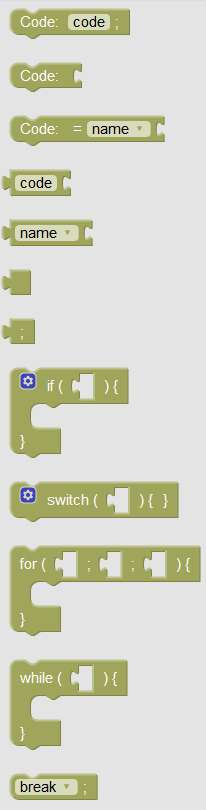
Each instruction can be stacked or connected to other instructions as if we were generating Arduino code (so it must be read as Arduino code with the tag “Code: ” at the beginning). By trial and error, you can learn how these blocks work, but we will document them in the future.
Documentation
We can generate documentation for every block by including a title and a short description. In addition to this, we can add additional information for every “Value Input”, “Statement Input” or any filed with a named associated with it.
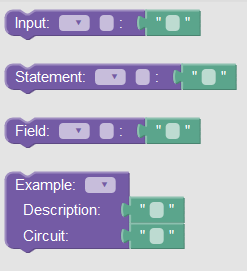
We can also create a documentation of the examples by adding a short description and a circuit.
The document, as a result of this documentation, will be an HTML file that will be shown when the users access to the help of the instruction.