Learn how to use the bluetooth module HC-06. DYOR robot uses this module to communicate with an external device, such as a mobile phone to be remotely controlled. Working principle, connection diagrams and Facilino programming example with Arduino Nano.
How does Bluetooth HC-06 module work?
Bluetooth communication based on the module HC-06 is quite easy, because it’s a device that allows to stablish a serial communication from the point of view of Arduino to any device, such as mobile phone or tablet.
Communication can be done with any of available pins of Arduino Nano, all but pins 0 and 1, because those pins are actually used by the USB serial interface. In this sense, the communication with the bluetooth module will be implemented with a software serial interface, which means that signals will be actually generated via software (not through a dedicated hardware), so we can freely choose the pins to implement the communication. The drawback is that Arduino’s CPU is dedicated to this purpose, which might affect to the overall performance and has some limitations in terms of the baudrate, although this is completely transparent.
The easiest way to communicate Arduino with any bluetooth device is by sending commands of one byte (values between 0 and 255), so that the number received/sent implicitly indicates which command to execute. Eventually, this can be too simple and we might need to stablish a more sofisticated communication protocol.
HC-05 module is very similar to HC-06 module, where the main difference is that HC-05 can be both master and slave of bluetooth communication, which can be used to communicate two robots.
REMARK: In orther to communicate with bluetooth, both devices must be paired. The default password for HC-06 is 1234, and the default name listed in the bluetooth search is HC-06, which is better to be changed in case of having several robots.
HC-06 Bluetooth module connection
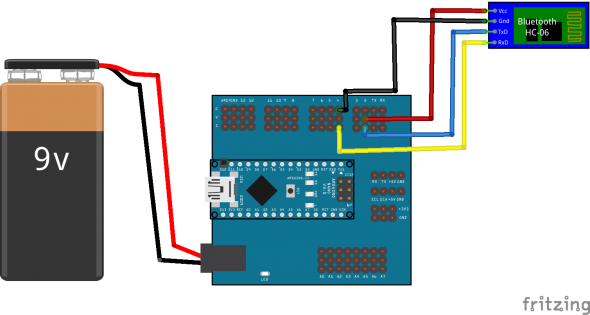
Here we describe the HC-06 bluetooth connection to Arduino. This module uses power (VCC) and ground (GND), transmission (TX) and reception (RX) (transmission and reception from the point of view of the bluetooth module). It is important to remark that TX and RX pins must be crossed, so that from the point of view of Arduino, it’s TX pin must be connected to the RX pin of the bluetooth module and viceversa.
- VCC: Power. Connect to any +5V pin.
- GND: Ground. Connect to any 0V pin.
- TX (HC-06) -> RX(Arduino): Digital input (from Arduino’s point of view). Connect to digital pins of Arduino.
- RX (HC-06) -> TX(Arduino): Digital output (from Arduino’s point of view). Connect to digital pins of Arduino.
Here we show a connection diagram of HC-06 module to Arduino Nano v3.0 with the expansion board with pins TX (HC-06) and RX (HC-06) connected to pins 2 (RX for Arduino) and 4 (TX for Arduino), respectively:
Here you can download the Fritzing file:
How to change device name?
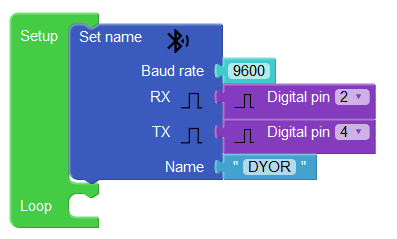
By default, HC-06 module has “HC-06” as default name. We can change this, this permanent changes.
Connection pins correspond to the previous diagram therefore, from Arduino’s point of view, RX pin corresponds to pin 2 and TX pin corresponds to pin 4. The default communication with the bluetooth module is 9600.
Here you can download Facilino file:
How to receive commands from my App?
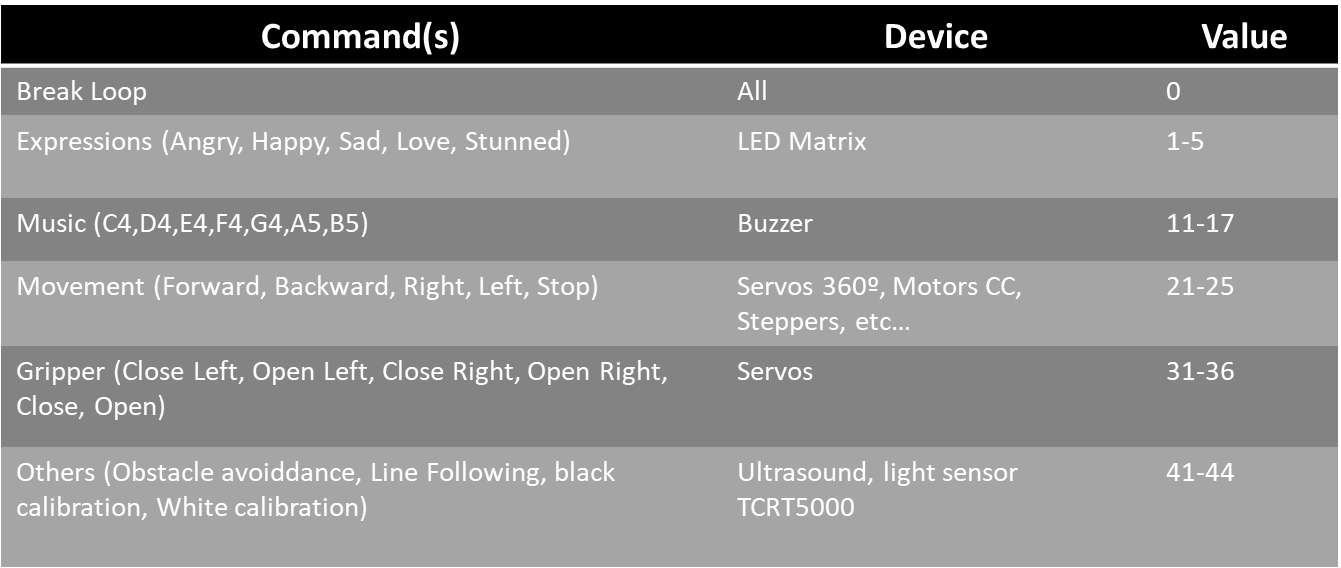
As mentioned before, we can define a set of commands to execute a set of instructions in case an order is sent from the App. We need to stablish an “agreement” between the App and Facilino so that both previously know what each command means. Here we show a table with the list of commands defined by default. If you need more commands, you can use any free value.
The instruction “Bluetooth App” is precisely used to receive commands from the App trough bluetooth o any other application capable of sending bluetooth commands. We can add more commands simply by clicking to the “*” symbol (mutable). We must indicate bluetooth pins of transmission and reception (from Arduino’s point of view). For each command we add the set of instructions that will be stacked within the command will be executed. There are two main modes to execute a command, a simple command or a “loop” command in which the last command will be repeated until the “Break loop” command is sent. This “loop” command might be useful for autonomous applications in which the robot simply needs a trigger to start executing an application such as obstacle avoidance, line following, etc.
In this example, we show can to process “Happy”, “Love” and “C4” (music note), based on this example, you can easily extend to new commands. In this particular example the “C4” note is repeated until the “Break loop” command is sent. As you can see, meanwhile a command is repeated, we can still send additional commands such as “Happy” or “Love”.

Here you can download Facilino code:
In order to develop a simple App with App Inventor 2, here we include some images with the user interface as well as the code to be used in your projects.
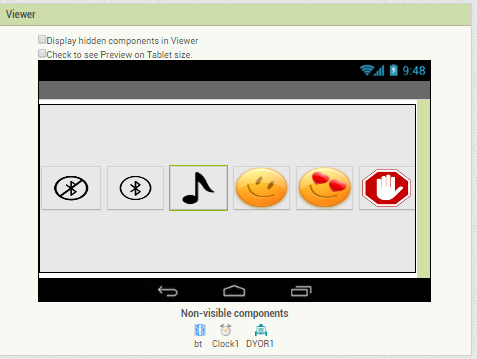
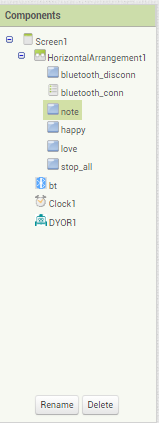
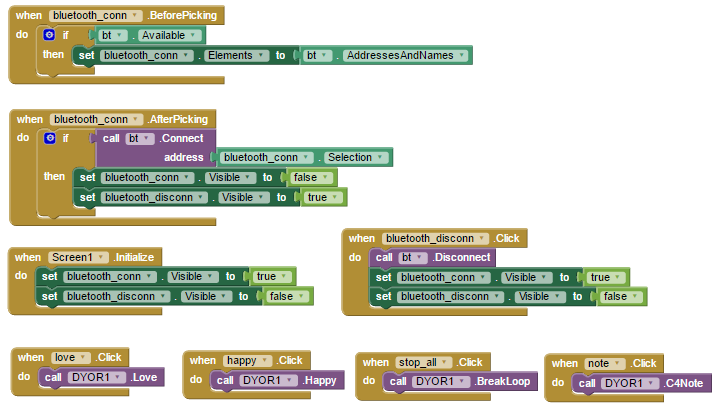
As you can see, in this example, we have add some buttons to connect/disconnect the bluetooth device (remember that is must be paired before, which is not the same as “connected”). In order to connect, we must be sure that there’s no other device with the same name, otherwise we need to change the device name. Every time we push a button, we are actually sending a bluetooth command with the specific byte value.
Here you can download the App Inventor 2 App:
Here we can directly install the App with a QR code: